Wellness and weight-loss injections are becoming increasingly common, especially with the rise of GLP-1 therapies and other compounded formulations that support energy, metabolism and overall wellness. While self-injection can feel intimidating at first, the process becomes manageable — and even routine — with the right preparation, technique and provider guidance.
In this guide, we’ll walk you through how to carefully self-administer subcutaneous (SubQ) and intramuscular (IM) injections, explain when each method is typically used, and share practical tips to help you feel confident and informed at every step.
Understanding Injection Types
When it comes to wellness and weight management therapies, not all injections work the same way. Some are designed for slower, sustained absorption, while others deliver results more quickly. Understanding the difference between SubQ and IM injections can help you feel more confident when discussing treatment options with your provider.
Subcutaneous (SubQ) Injections
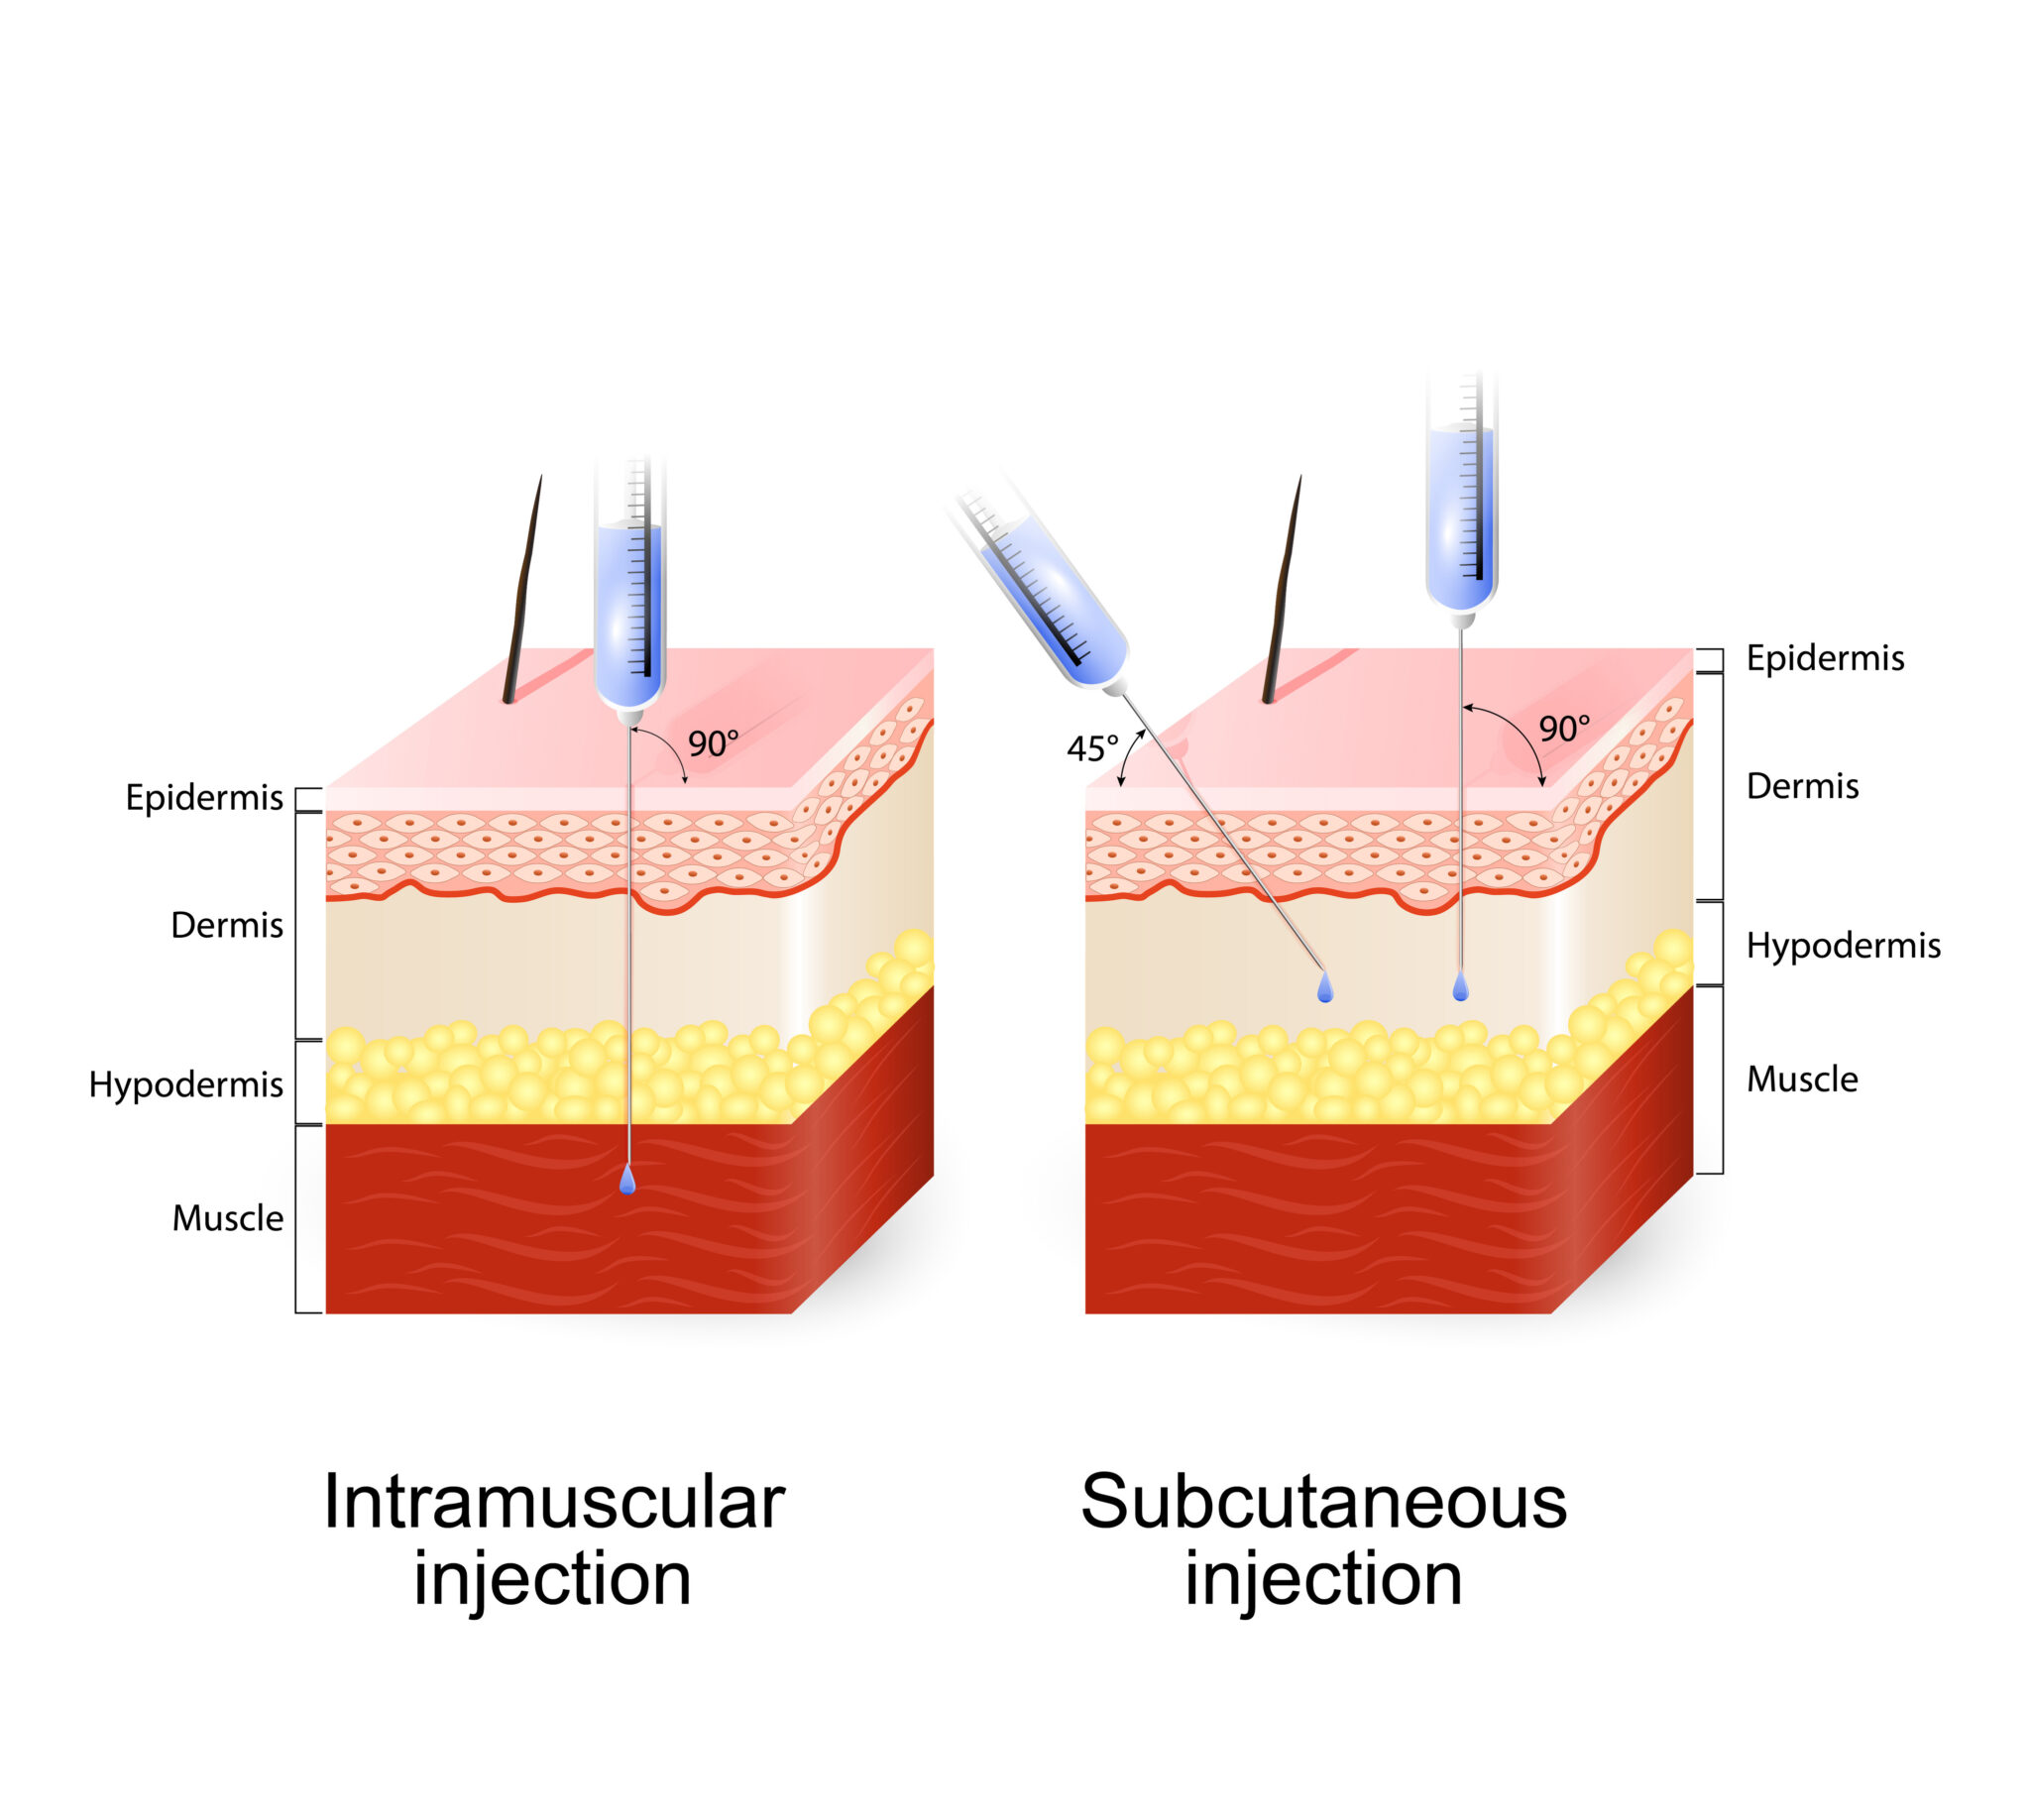
SubQ injections are administered just beneath the skin into the fatty tissue layer. Because they use smaller, finer needles and deliver medication gradually, they’re typically less uncomfortable and better suited for formulations that benefit from slower absorption. Many of our wellness and weight-management therapies, including Cyanocobalamin (B12), Liraglutide, Sermorelin and NAD+, are commonly administered this way.
Intramuscular (IM) Injections
IM injections deliver medication deeper into the muscle, where it can be absorbed into the bloodstream more quickly. These injections often use slightly longer needles and are ideal for therapies where faster uptake is beneficial. L-Carnitine and some MICC formulations are often administered intramuscularly, especially when supporting fat metabolism or boosting energy.
[button url=”https://amoremeds.com/contact-us/”]Have Questions? We’re Here to Help[/button]
Preparing for a Proper Self-Injection
Taking a few minutes to prepare before giving yourself an injection can make the process smoother and less stressful. Focus on creating a clean, organized environment and reviewing your provider’s instructions before you begin.
1. Choose a Clean, Quiet Space
Choose a flat, well-lit surface where you can lay out your supplies. Make sure the area is clean and free from distractions. Having everything within reach helps you stay focused and avoid mistakes.
2. Wash and Sanitize Your Hands
Wash your hands thoroughly with soap and warm water for at least 20 seconds, then dry them completely. If soap and water aren’t available, use an alcohol-based hand sanitizer instead.
3. Gather Your Supplies
Before starting, make sure you have all the items you’ll need within reach, such as:
- Medication vial(s)
- Syringe and needle
- Alcohol swabs
- Sharps disposal container
- Gauze or cotton pads
Having all your supplies ready ahead of time helps the process go smoothly.
4. Review Provider Instructions
Before you begin, carefully review the instructions given by your licensed provider. This ensures you understand the correct medication, dosage and administration method for your medication.
5. Create a Focused Environment
Keep pets, children and distractions away from your injection area. Make sure you’re comfortable and can focus entirely on the steps ahead.
How to Self-Inject Subcutaneously
SubQ injections deliver medication into the fatty layer just beneath the skin. Following these steps can help make the process consistent and more comfortable.
1. Measure Your Dose
Always begin by reviewing the instructions provided by your licensed provider. Your prescription will indicate the exact amount of medication to use, often listed in milliliters (mL) or units. When using an insulin syringe, remember to measure the dosage using the top of the plunger stopper for accuracy.
2. Choose an Injection Site
SubQ injections are typically given in areas with more fatty tissue. Common sites include:
- Upper arm (deltoid): Backside of the arm, halfway between the elbow and shoulder.
- Belly (abdomen): Below the ribs and above the hip bones, at least 2 inches away from the belly button.
- Thigh: Upper portion of the thigh, between the front and outer areas.
3. Prepare Your Medication
- Wash your hands thoroughly with soap and warm water.
- If your medication is stored in the refrigerator, allow the vial to sit at room temperature for about 10 minutes.
- Remove the protective metal foil seal by lifting the perforated ring and peeling it away.
- Wipe the rubber stopper on the vial with an alcohol swab and allow it to dry completely.
4. Load the Syringe
- Hold the vial upright and puncture the rubber stopper with the needle.
- Turn the vial upside down and slowly draw up your prescribed dose into the syringe.
- Use the top edge of the plunger stopper to measure your dose accurately (e.g., 10 units = 0.1 mL).
- Tap the syringe gently to bring any air bubbles to the top, then push out the excess air before injecting.
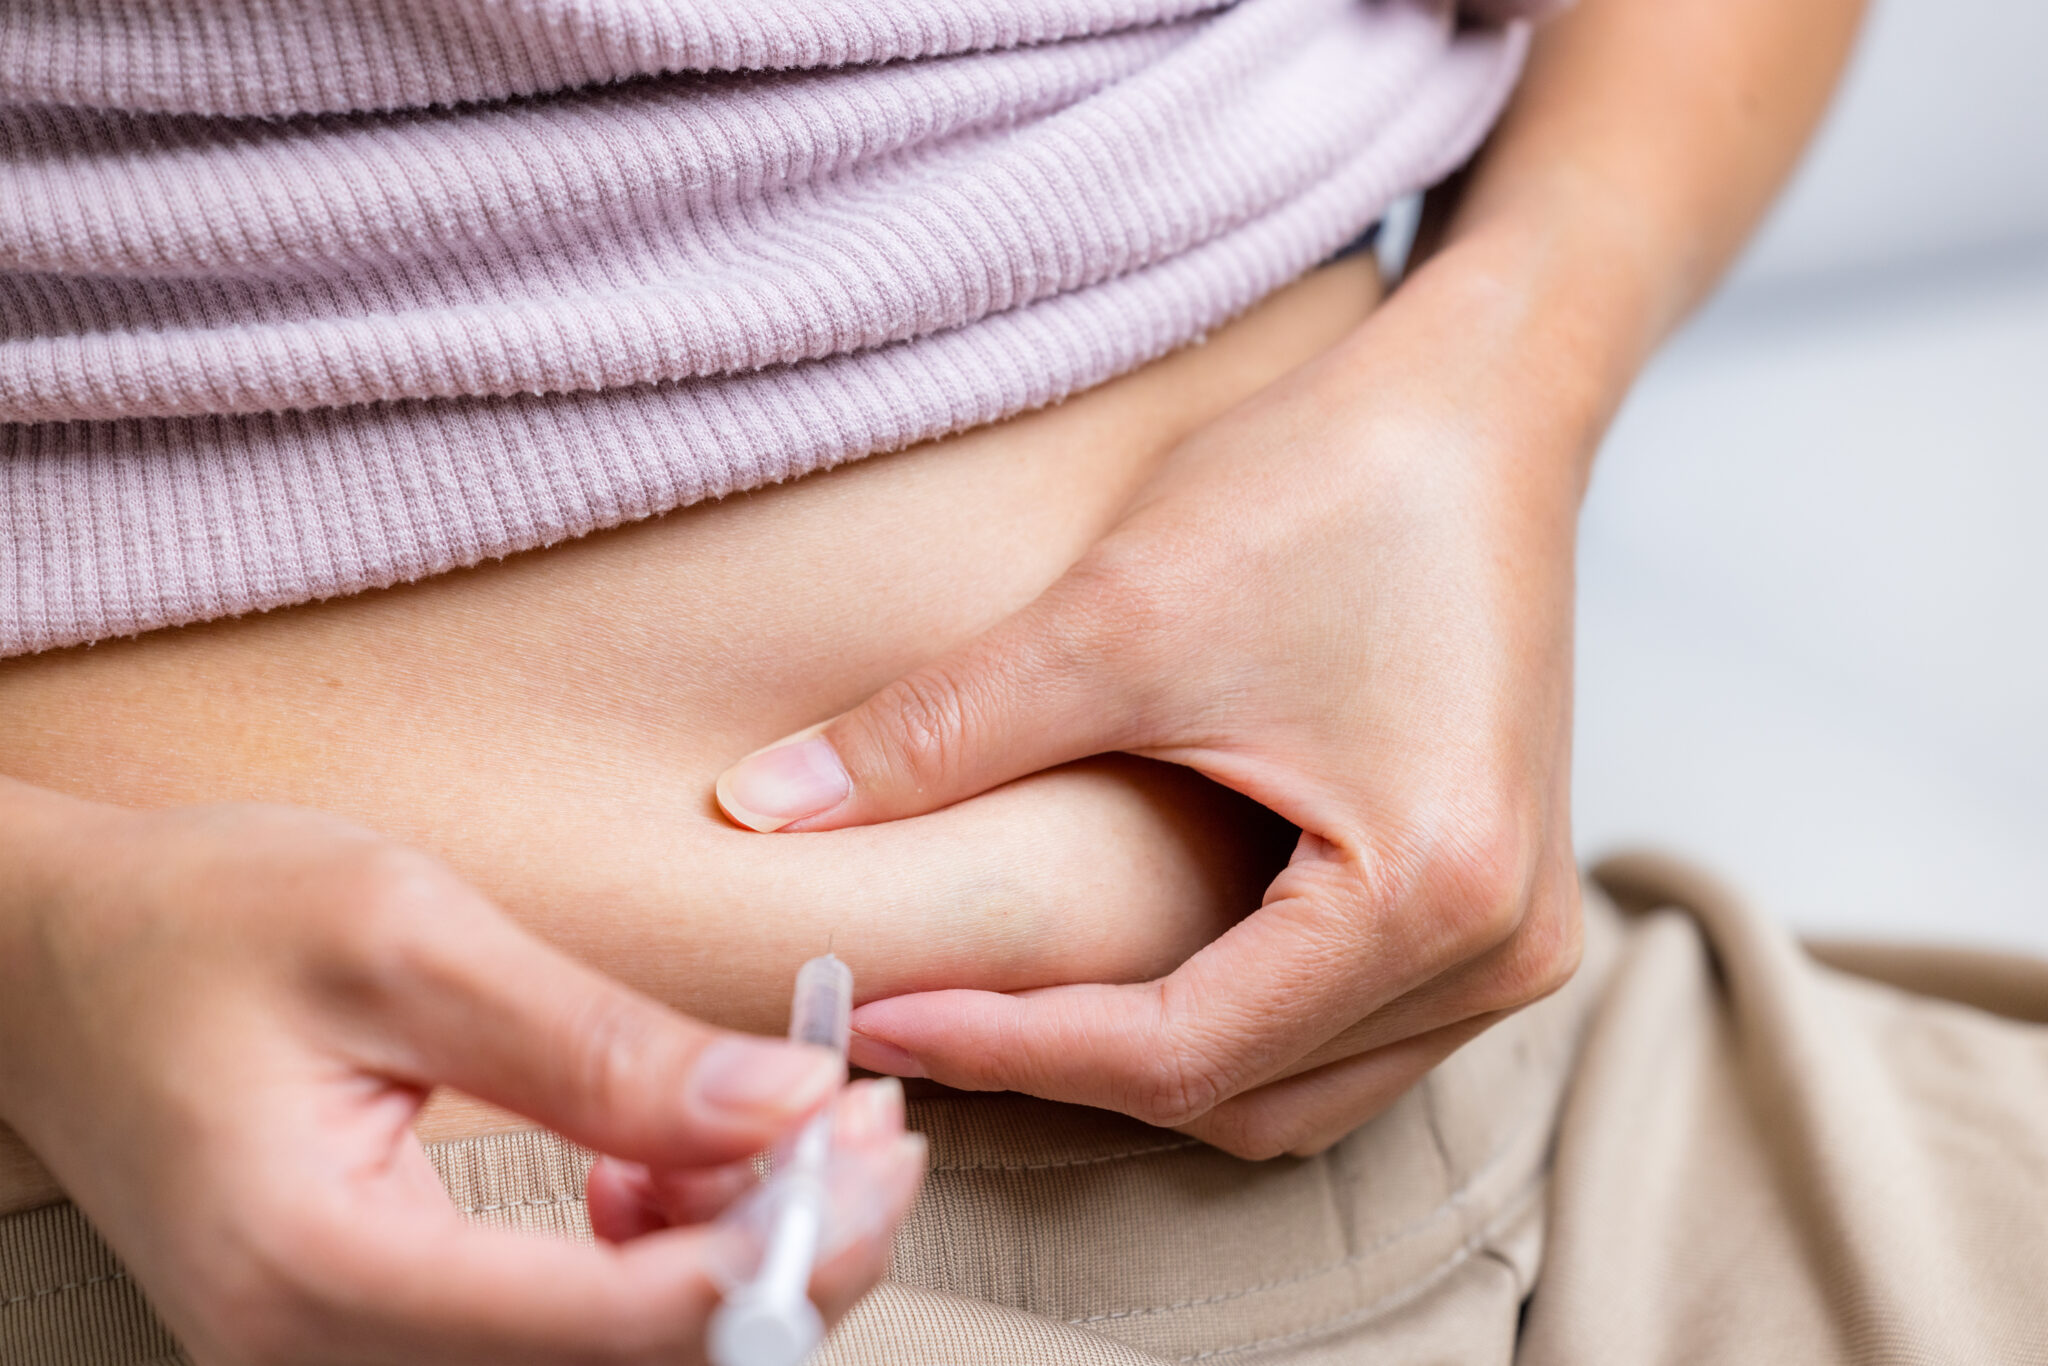
5. Sanitize and Pinch the Skin
- Sanitize your chosen injection site with a fresh alcohol swab and let it dry.
- Using your non-dominant hand, gently pinch 1-2 inches of skin to create a stable surface.
6. Insert the Needle
- Hold the syringe in your dominant hand and position the needle at a 90° angle.
- Insert the needle using a smooth, steady motion until it’s fully under the skin.
- Push down on the plunger slowly and evenly until the full dose is delivered.
- Remove the needle at the same angle, then apply gentle pressure to the site with a clean cotton pad or gauze for a few seconds.
7. Remove and Dispose
- Dispose of the used needle and syringe immediately in an FDA-cleared sharps container or another designated disposal container.
- Apply light pressure with gauze or a clean cotton pad if any bleeding occurs.
- Avoid rubbing the area, but you can lightly massage it if your provider recommends it.
For a clear visual guide, watch our YouTube tutorial here.
How to Self-Inject Intramuscularly
IM injections deliver medication directly into the muscle, where it can be absorbed more quickly than subcutaneous injections. With the right preparation and technique, IM injections can be performed at home under the guidance of your licensed provider.
1. Measure Your Dose
Start by reviewing the dosage instructions provided by your licensed provider. Similar to SubQ injections, your prescription may list the amount in mL, units or both. Always confirm the exact dose before preparing your injection.
2. Choose an Injection Site
Intramuscular injections are typically administered in one of three locations:
- Upper arm (deltoid): Outer, rounded part of the upper arm, about halfway between the shoulder and elbow.
- Thigh: Upper outer portion of the thigh, between the front and side of the leg.
- Gluteus maximus: Upper outer quadrant of the buttock, away from major nerves and blood vessels.
3. Prepare Your Medication
- Wash your hands thoroughly with soap and warm water.
- Remove the protective foil seal from the vial by lifting the perforated ring and peeling it away.
- Clean the rubber stopper with an alcohol swab and let it dry completely.
4. Load the Syringe
- Hold the vial upright and puncture the rubber stopper with the needle.
- Turn the vial upside down and slowly draw up your prescribed dose into the syringe.
- Use the top edge of the plunger stopper to measure the dose accurately.
- Tap the syringe gently to bring any air bubbles to the top, then push out the excess air before injecting.
5. Sanitize the Injection Site
- Clean the chosen area with a fresh alcohol swab and let it dry completely.
- Avoid touching the sanitized area after cleaning to reduce the risk of introducing bacteria.
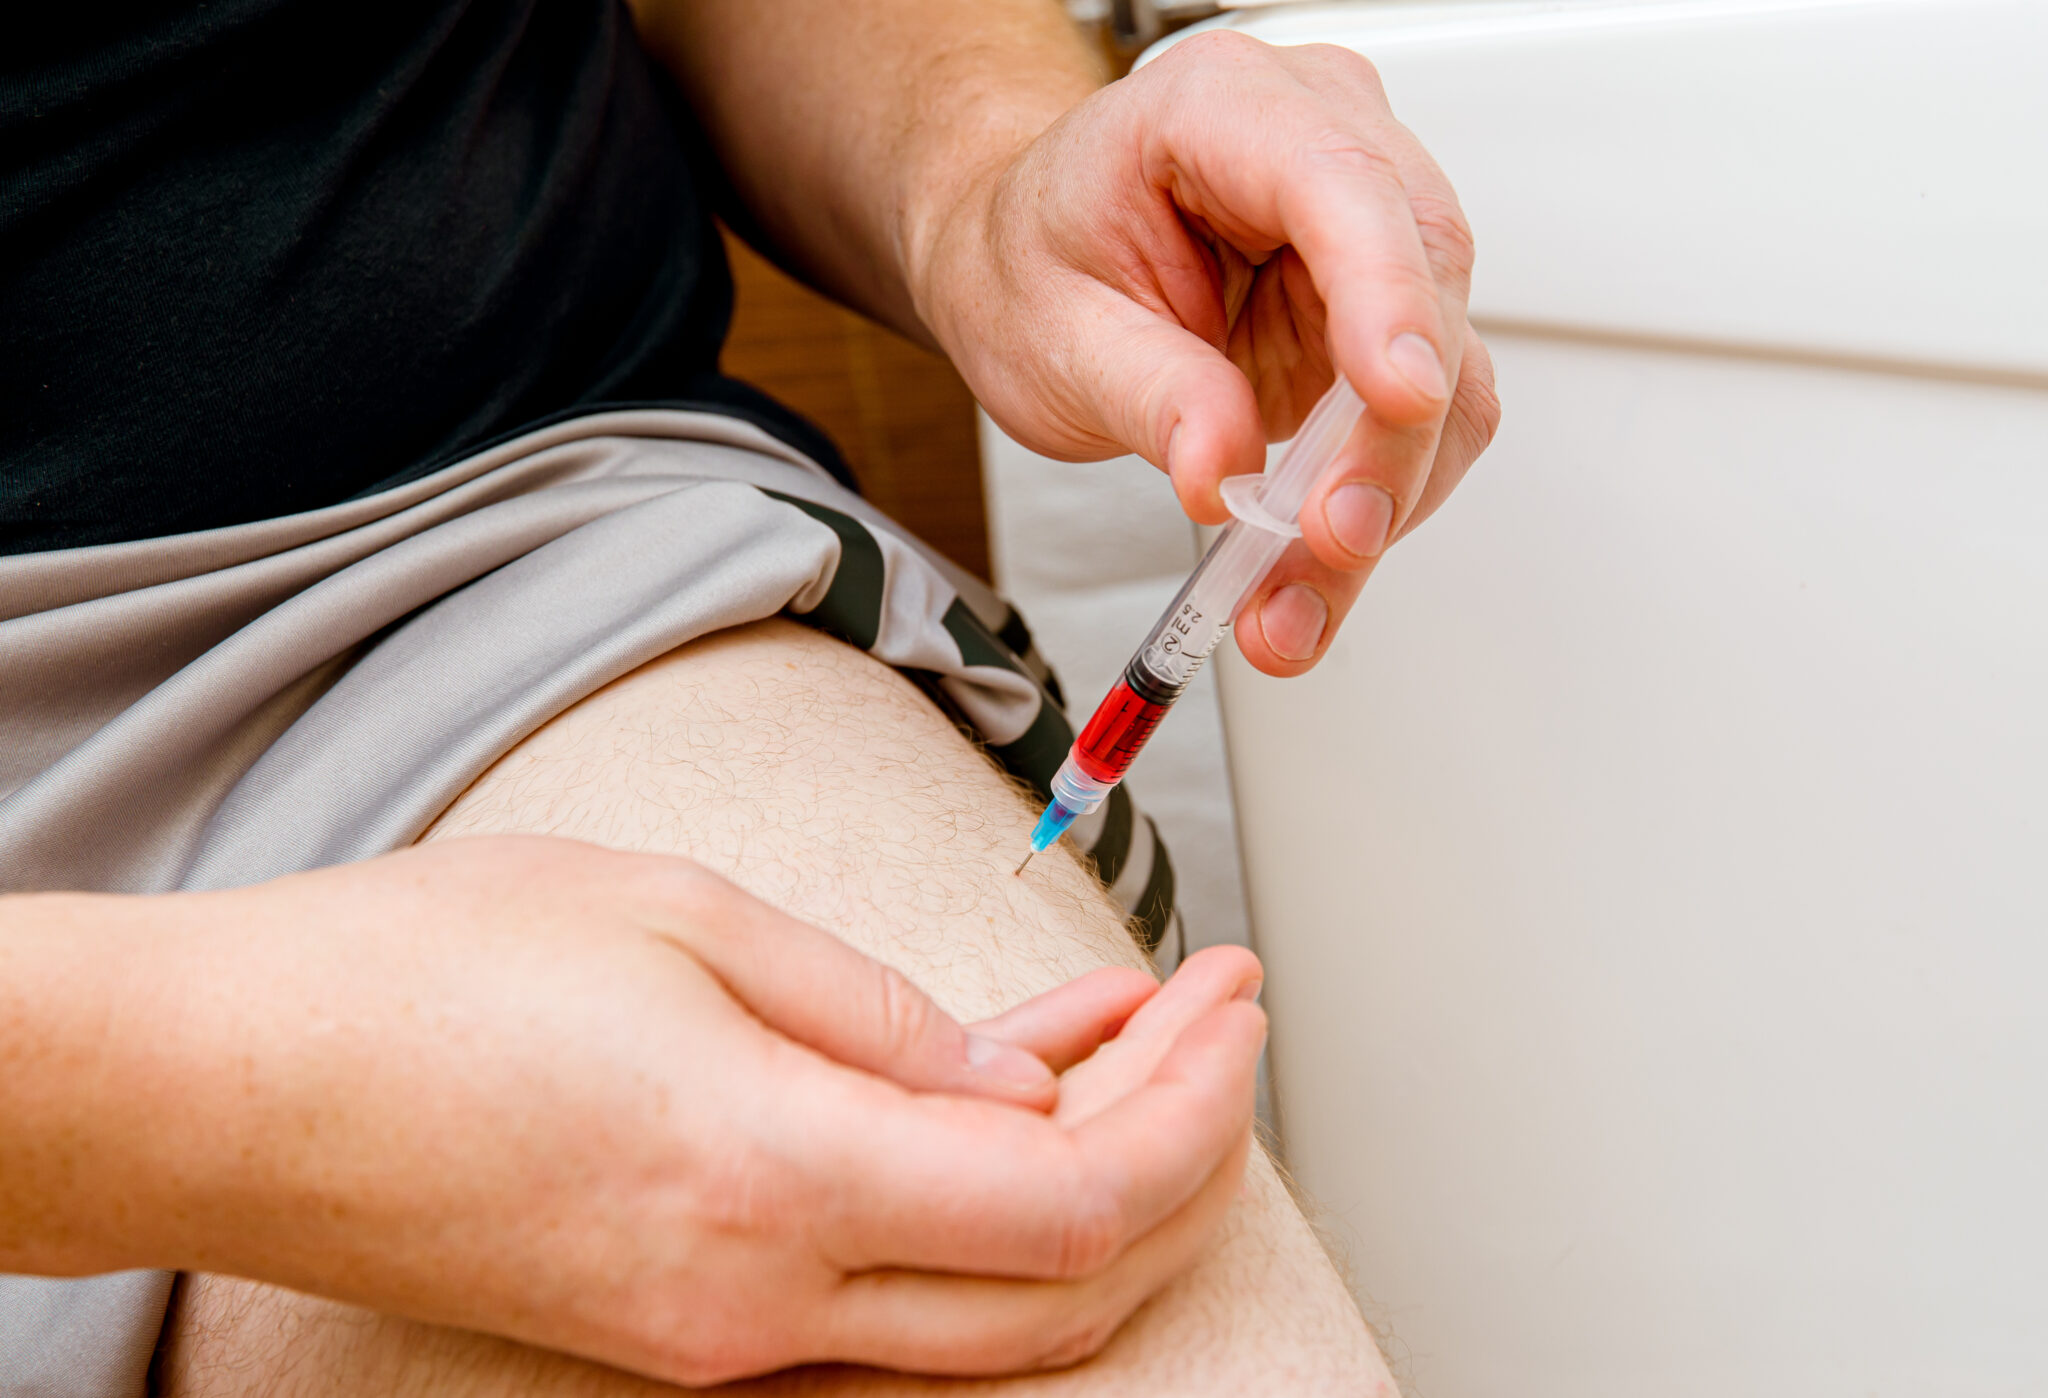
6. Insert the Needle
- Hold the syringe in your dominant hand and position the needle at a 90° angle.
- Insert the needle using a smooth, dart-like motion until it reaches the muscle.
- Slowly depress the plunger to deliver the medication at a steady pace — about 1 ml every 10 seconds is a good guideline for minimizing discomfort.
- Remove the needle at the same angle it entered and apply gentle pressure to the site with gauze or a cotton pad.
7. Remove and Dispose
- Dispose of the used needle and syringe immediately in an FDA-cleared sharps container or another designated disposal container.
- Apply light pressure with gauze if there’s minor bleeding.
- Avoid rubbing the area, but you can lightly massage it if your provider recommends it.
Best Practices for Self-Injections
Following proper injection techniques helps reduce irritation, reduce the risk of infection and ensure consistent medication absorption. Keep these tips in mind every time you prepare and administer an injection:
- Rotate injection sites: Switch up your injection spots to avoid irritation, bruising and scar tissue. Rotating sites also helps maintain steady absorption of your medication.
- Use a new needle and syringe every time: Never reuse equipment. Fresh, sterile supplies reduce the risk of infection and make injections more comfortable.
- Sanitize before injecting: Wash your hands thoroughly and clean the injection site with an alcohol swab before every injection.
- Watch for warning signs: Contact your licensed provider if you notice persistent redness, swelling, bruising, warmth, pus or other signs of infection, as well as any unexpected side effects.
- Dispose of supplies properly: Place used needles and syringes in an FDA-cleared sharps container or another designated disposal container. Learn more about proper disposal.
Frequently Asked Questions About Self-Administering Injections
1. What’s the difference between SubQ and IM injections?
The main difference is where the medication is delivered:
- SubQ injections go just beneath the skin into the fatty tissue layer. They typically use smaller, finer needles and are designed for slower, sustained absorption.
- IM injections go deeper into the muscle, allowing the medication to be absorbed more quickly into the bloodstream.
2. Where is the best place to inject SubQ?
The best areas for SubQ injections are places on the body with a soft layer of fatty tissue just beneath the skin. These spots tend to be less sensitive and make it easier for the medication to absorb gradually. Many people find the upper arm, abdomen and thigh to be the most comfortable and accessible. To reduce irritation and minimize the risk of scar tissue, it’s best to rotate between injection sites rather than using the same spot every time.
3. Do self-injections hurt?
Most people experience only mild discomfort during self-injections, especially with SubQ injections that use smaller, finer needles. Intramuscular injections may feel slightly more noticeable since the needle goes deeper into the muscle, but using proper technique and following your provider’s instructions can make the process more comfortable.
4. How can I avoid bruising from injections?
Bruising is common and usually harmless, but you can reduce the risk by:
- Rotating injection sites to avoid overusing the same area.
- Allowing alcohol from the prep swab to fully dry before injecting.
- Using a smooth, steady motion when inserting the needle.
- Applying gentle pressure and not rubbing the area after removing the needle.
If bruising persists or worsens, check in with your licensed provider.
5. How do I dispose of needles properly?
Always place used needles, syringes and related supplies in an FDA-cleared sharps container or another designated disposal container immediately after use. Never throw loose needles into household trash.
Learn more about how to dispose of used needles and syringes properly.
6. Can I give myself an IM injection?
Yes, many people self-administer intramuscular injections at home, but it’s important to:
- Follow your provider’s instructions closely.
- Choose an appropriate injection site, such as the deltoid, thigh or gluteus maximus.
- Practice proper preparation and sanitation techniques.
If you ever feel unsure, ask your licensed provider to demonstrate the correct technique before attempting an IM injection on your own.
Discover Amore Meds’ Provider-Guided Injection Therapies
Learning to self-administer injections can feel overwhelming at first, but with practice, proper preparation and provider guidance, it quickly becomes a manageable part of your wellness routine. Whether your therapy involves subcutaneous or intramuscular injections, following the right techniques and best practices can make all the difference in your comfort and confidence.
Amore Meds is committed to supporting your health journey by providing high-quality compounded formulations and educational resources that help you to feel informed and in control. From weight-loss therapies to wellness blends, our provider-guided medications are designed to fit into your lifestyle.
Ready to learn more about Amore Meds’ physician-guided injection therapies?
[button url=”https://amoremeds.com/contact-us/”]Connect With Our Team[/button]